Wednesday, December 3, 2008

How to setup a custom FortiClient install.

In this tutorial I will demonstrate how you should setup a custom Forticlient install for your users and include some example scripts to help you along.


1. Log into the Fortinet Support site and download the latest .zip package of Forticlient.

[Note that the install packages with _FG in the filename are for uploading directly to the Fortigate only.]


ftp://support.fortinet.com/FortiClient/v3.0/


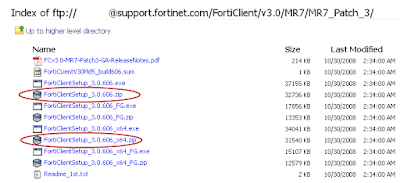
See [LINK] for Readme.txt explanation of different install packages.


2. Unzip contents.


3. Install Forticlient.msi to a clean system/PC. Then proceed to configure the client as you would like it configured for your end-users.


[When installing; make sure to install only the components that you would like installed for your users as well. This will make the rest of the process a little simpler.]


See [LINK] for a sample FortiClient configuration.


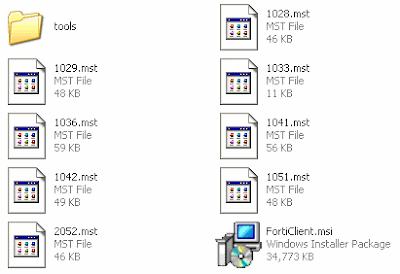
4. Create a folder with a simple filename like "forticlient" in the root of C:\ and copy FCRepackager.exe and Forticlient MSI to it.

FCRepackager.exe can be found in FortiClientSetup_3.0.606\tools.

[Make sure you read FCRepackager_Readme.txt for all available switches and options.]


5. Run c:\forticlient\FCRepackager.exe -i AV,VPN,FW,WF -L p@ssw0rd -v at a DOS prompt.


This command string is executing the following:

Components installed:
AntiVirus,VPN,Firewall,WebFilter

Admin password = p@ssw0rd

Verbose Output:

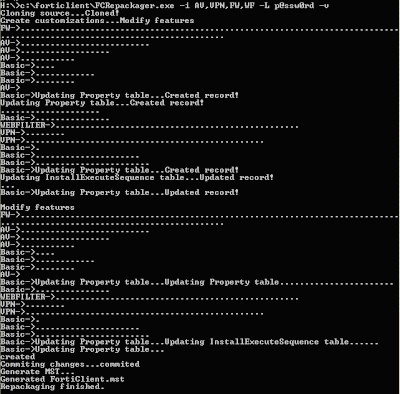
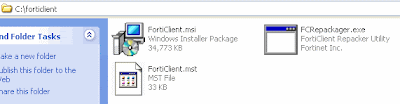
This process creates the FortiClient.mst file which is required in the next steps. Make sure you place in the same folder as FortiClient.msi if it is not already located there.


6. Scripting the install.


A) To install Forticlient off of a network drive I like to use this little 2 part batch script.

[Make sure that move Forticlient.msi, FortiClient.mst and the scripts into the same folder on the server. In this case it is \\xSERVERx\FortiClient\MR7_Default_Install\.]

Step1.bat
cls
@echo off
TITLE Forticlient MR7 Patch3 Default Install

c:

net use v: \\xSERVERx\FortiClient\MR7_Default_Install


echo This is a silent install.......
echo You will be prompted when finished.
echo.

xcopy v:\*.* C:\Forticlient\*.* /F /Y


echo.
echo.
echo I mapped the install folder to V:\ and copied all of the contents to c:\Forticlient.
echo.
echo.
echo Another script will start and you will lose your connection to your network drives. Sorry.....

call c:\Forticlient\step2.bat

net use v: /delete

echo V:\ drive removed
echo Goodbye
exit

Step2.bat

@echo off
TITLE Forticlient MR7 Default Install [PART 2]

echo ......Installing..... Please Wait......

start /wait msiexec /i c:\Forticlient\FortiClient.msi TRANSFORMS=c:\Forticlient\FortiClient.mst /qn+

echo.
echo.
echo.
echo.
echo.

echo done

pause

B) To script a local install just recycle step2.bat from above. Just make sure that all of your files are in c:\forticlient.


Tuesday, December 2, 2008

Visual FortiClient Overview


General


-Status

-Connection


VPN

-Connections
-My Certifcates


-CA Certificates
-CRL Certificates

AntiVirus

-Scan

-Settings

-Realtime Protection

-Email

-Quarantine

-Registry Monitor

Firewall

-Status
-Applications

-Network

-Intrusion Detection

-Advanced

Webfilter

-Global Settings

-Profile Settings

-Per User Settings
Maintenance

-Update

-Backup/Restore

Logs

-Logview
-Settings

Monday, June 2, 2008

How to create quick scripts using the CLI

For those of you who are too lazy or just simply dont feel like learning another scripting language, I will now show you how to get any script you want for the Fortigate units using the CLI. We are going to use the Diagnose Debug branch commands in order to accomplish this.

You will need an SSH client to do this. [Ex. Putty]

1. Start an SSH session to your box.
If SSH is not enabled then log into the GUI and enable it under System>Network>[Interface]

2. Run > Diag debug enable

3. Run > Diag debug cli 7


4. Now just keep this window open and log into the GUI and make changes to your config that you would like scripted.
This will allow all changes made in the gui to output the corresponding CLI commands in your SSH client.


In the above example I have created a new Firewall Address called "Local" and then added it to a new Firewall Policy for "Internal>WAN1".
In order to make this into a usable script you will have to copy the script into a text file and edit out the "O: " that precedes the commands.

I hope that you have found this useful.... :-)

Saturday, May 31, 2008

Basic FortiClient Serverside Configuration

Alright, so, this is a basic configuration of a Fortigate 60 for use with FortiClient VPN clients using Xauth and local users for authentication.

1. Create your local user(s): User > Local > Create New


2. Add the user to a new group: User > User Group > Create New
Make sure the type is set to "Firewall" and add the user to the members section.


3. Phase 1 VPN: VPN > IPSec > Create Phase 1
Create a new phase 1 with the options selected below. Fortinet recommends Aggressive mode but I have found that it also works well with Main Mode. Fortinet also recommends using Peer IDs but once again, this way works as well.
Notice that this is going to be a dialup tunnel so, therefore, Interface mode is not enabled. Dont forget to select Xauth with the apporiate group.

4. Phase 2 Tunnel: VPN > IPSec > Create Phase 2
Enable "DHCP over IPSec" and add the source and destination addresses.


5. Now Create a new DHCP Server: System > DHCP > Internal > Add DHCP Server

6. Configure DHCP Server:
Make sure the type is set to "IPSEC" and the range that you want your Forticlients to pull is not already being used on your network. The Default Gatway will be the IP of your Fortigate Device.

7. Create Address of Forticlients Range: Firewall > Address > Create New
For demonstration purposes our range will be 192. 1.x.[1 - 254]. Notice the format required for defining ranges in Firewall Addresses.

8. Create 2 Policies: Firewall > Policy > New
2 Policies are required in order to make this work. One will be used for the DHCP service and the other for client traffic.

9. DHCP Policy:
Make sure the service selected is "DHCP" with the action of "IPSEC". Select the correct tunnel and select "Allow Inbound", "Allow Outbound", and "Inbound NAT" as it is displayed below.
Notice that the address name is set to "ALL" in this policy.

10. Client Policy:
In this policy we select the "Forticlients" firewall address under the destination address name with the service set to "ANY" with the action of "IPSEC". Use the same VPN Tunnel properties as above.


So there you have it. Your all set on the serverside of this config. I will soon put up the client config to match this setup and allow you to connect. I will put up a brief overview of the FortiClient with it's various pros and cons. Please leave a comment if you have any questions.

Friday, May 30, 2008

Welcome!

I guess you can call this the grand opening of my Fortinet Tips Blog. One thing I found when trying to find help and information regarding Fortinet products is that IT'S NOT THERE! There is literally almost NO information out there regarding troubleshooting these devices. It is as if their techsupport get's paid by the ticket or something.

Anyway, here you will find information regarding the following products:

Fortigate
FortiManager
FortiAnalyzer
FortiClient
FortiMail
Scripting for Fortinet Devices

If there is anything you guys want to know just ask in the comments or email me and I will see about writing up a post for it.